
Wedding planning comes with all kinds of fun tasks. From touring venues and flipping through photography portfolios to meeting DJs and sampling cakes, there’s no end to the unique errands that come with organizing your big day — and let’s not forget assembling wedding invitations!
Wedding invitations are your first opportunity to showcase your nuptials’ look and feel. Choosing the right stationery, selecting the perfect font, and organizing the informational cards are vital parts of the planning process.
Not sure how to assemble wedding invitations? Keep reading, grab your envelopes, clear some space, and learn how to assemble your wedding invitations in style.

In most cases, wedding invitations aren’t just a single sheet of paper printed with the ceremony details. Instead, they consist of several cards called a wedding invitation suite. You need to understand the various wedding invitation suite components if you want to properly assemble wedding invitations.
The largest and most important card in the invitation suite, the wedding invitation, includes key details about the wedding, such as time, date, ceremony location, and reception location. It may include a link to your wedding website as well.
This smaller card is where guests indicate whether or not they’ll be attending the ceremony. Many response cards also include an RSVP deadline and a place to indicate a meal preference for the reception.
Make it easy for guests to RSVP by including a pre-addressed, postage-paid envelope for the response card.
Provide details about the wedding reception (like time, address, transportation information, and planned events) on a separate card if the reception is in a different location than the ceremony.
A typical wdding invitation suite weighs more than a standard envelope, so you’ll pay extra for postage. Have the post office weigh your invitations so you know exactly how much to pay.
Beyond the above wedding invitation suite necessities, there are also a few optional extras you might consider including in your wedding invitations.
An inner envelope is slightly smaller than the outer envelope. It holds the invitation, response card, response envelope, and any additional cards. Write the guests’ names on the outside of the envelope.
Smartphones are great for navigation, but they’re far from foolproof. Provide guests with clear, easy-to-read directions on a separate card, just to be safe.
If you have planned several days of events, write the activities on a separate card. This helps guests know what to expect and plan accordingly. A weekend itinerary card is also a great way to indicate which activities are for adults only.
Use this card to provide hotel recommendations and/or information about room blocks. You should also provide transportation details for traveling between the hotels and the wedding venue.
Secure all the bits and pieces of your wedding invitation suite with a belly band or ribbon. Opt for a wrapper in one of your wedding colors and add embellishments for extra pizazz.
Now that you’re familiar with the pieces that make up wedding invitation suites, it’s time to figure out how to assemble wedding invites. It looks complicated at first, but these step-by-step instructions will guide you through the process.
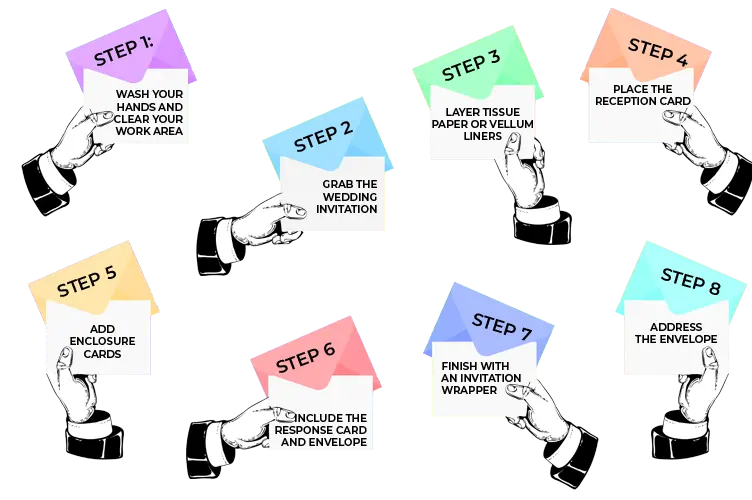
You might be inclined to skip this step, but don’t! Starting with clean hands and a large open workspace makes assembling wedding invitations much easier.
Wedding invitation suites are assembled according to size, starting with the largest piece first. In most cases, that’s the wedding invitation. Place the invitation printed side up.
They’re not used as much nowadays, but back in the day, liners were inserted between cards to prevent ink from smearing. While ruined ink probably won’t be a problem, you can still include dividers for an extra dose of style. To use them, place a sheet of tissue paper or a vellum liner on top of the wedding invitation.
Place the reception card face up on top of the wedding invitation.
Stack driving directions, accommodation information, and/or the weekend itinerary face up on top of the reception card. Place the largest card first, then layer smaller cards on top. If using a folded invitation, don’t stack cards on top. Instead, tuck the cards inside the fold.
Place the pre-addressed, postage-paid response envelope on top of the enclosure cards. Arrange the response envelope so the printed side faces down and the envelope flap is on the left. Slip the response card under the envelope flap, printed side up.
Secure the wedding invitation suite with a belly band, silk ribbon, or vellum wrap.
If you want to make your wedding invitation suite more formal, place the assembled packet into an inner envelope printed with the guests’ names. Slide the inner envelope into an outer envelope and add the guests’ names and addresses.
An inner envelope isn’t necessary. Inner envelopes are more of a stylistic choice. To save money (and paper), simply place the wedding invitation suite into an outer envelope and address it to the guests.
With a few exceptions, wedding invitation wording is up to you. However, the text usually follows this order: host line (only include if someone besides the couple is paying for the event), the invitation to attend, the couple’s names, the wedding date and time, the venue location, the reception details, and the dress code.
Using a silk ribbon, belly band, or vellum wrap is an excellent way to hold all the pieces of a wedding invitation suite together. To assemble, tie or seal the wrapper around just the invitation. Once attached, slide the other cards into the wrap for a tight fit.
According to traditional wedding etiquette, the bride’s name should be listed before the groom’s name on wedding invitations. This convention came about because the bride’s parents often financed the wedding (and therefore invited the guests). For same-sex nuptials or weddings hosted by the couple, feel free to experiment with the name order.
Whether you’ve got a small guest list, want to save some money, or want to add a personal touch to your wedding invitations, it’s perfectly fine to make them out by hand. You don’t need a bunch of extra cards when choosing this option. Simply write a small note or letter to each guest, varying the wording as you see fit.
Some of the easiest ways to make wedding invitations look nice include using high-quality paper, opting for specialty printing like embossing or letterpress, and/or adding a luxurious invitation wrapper. Hiring a calligrapher to address the inner and outer envelope is another great way to add some class. Lastly, it’s a good idea to hand-cancel postage stamps to avoid ink smears.
Well-assembled wedding invitations are essential when planning your wedding, but they’re just a small part of the planning process. Once they’re in the mail, you still need to write your vows, put the finishing touches on your outfit, and finalize your honeymoon itinerary.
With so much to take on, it’s completely normal to feel overwhelmed by your wedding to-do list. Thankfully, The Groom Club is here to help every step of the way. No matter what you’ve got on your plate, the articles on our wedding page will help you organize your big day.