How to Tie a Tie: Step-by-Step Guides to 4 Classic Knots

By  Tommy Peske
Updated on 12/22/23
How to Tie a Tie: Step-by-Step Guides to 4 Classic Knots

How to Tie a Tie: Step-by-Step Guides to 4 Classic Knots

By  Tommy Peske
Updated on 12/22/23
Groom Hacks

Part of the Groom Hacks

How to Tie a Tie: Step-by-Step Guides to 4 Classic Knots

By  Tommy Peske
Updated on 12/22/23
seperator

Whether it’s the result of remote work or the longstanding assistance of a family member, you now find yourself in the unfortunate position of not knowing how to tie a tie. Instead of resorting to a clip-on tie or abandoning neckwear altogether, we encourage you to learn this fundamental skill. After all, genuine style begins with mastering the basics, and tying a proper knot is a cornerstone of sartorial finesse.

To help you out, we’re detailing four classic knot styles: the four-in-hand, full Windsor, half Windsor, and Pratt. We’ll guide you through tying each knot with detailed, step-by-step instructions. With just a bit of patience, you’ll soon be tying your own tie easily. Even more importantly, you’ll radiate confidence and elegance as you do.

The Four-in-Hand Knot

How to tie a tie, four in hand knot
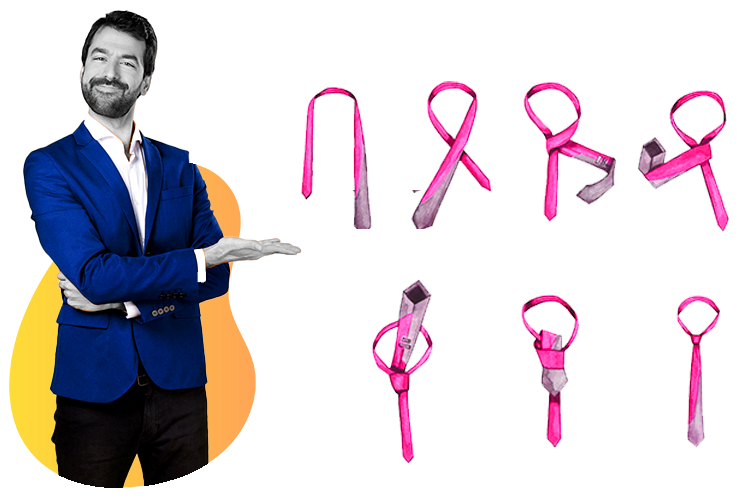
Called either the simple or the schoolboy knot, the four-in-hand is recognized as a straightforward, easy knot. The final product is a narrow, asymmetrical knot that’s well suited for a shirt with a narrow spread collar.

How to Tie a Four-in-Hand Knot

  1. Place the wide end of the tie under the left side of your collar, making sure it falls 8 to 12 inches below the thin end of the tie. 
  2. Cross the wide end over the thin end.
  3. Pull the wide end underneath the thin end. 
  4. Complete a second horizontal loop, pulling the wide end underneath the thin end. 
  5. Bring the wide end through the neck loop. 
  6. Hold the knot loosely as you slip the wide end through the loop. 
  7. Release your finger and tighten the knot. 
  8. Create a dimple by pressing the area under the knot with your index finger, while pinching the knot with your thumb and middle finger.
  9. Accessorize with a tie bar, clip, or pin (optional).  

The Full Windsor Knot

How to Tie a Tie: Step-by-Step Guides to 4 Classic Knots
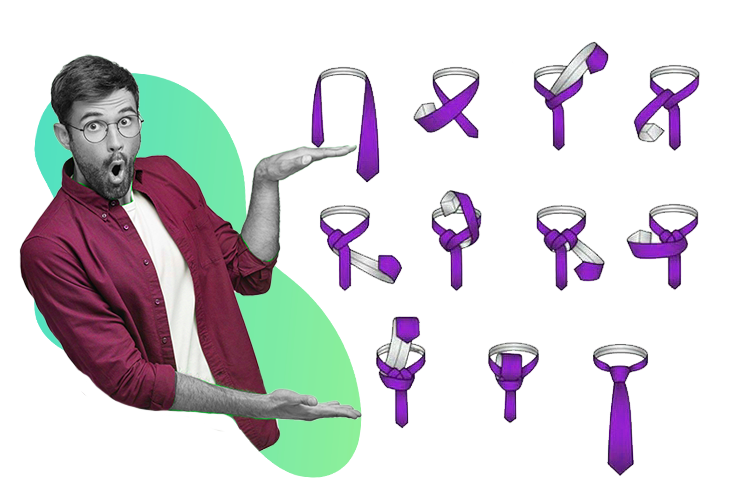
Also called a Windsor or a double Windsor, this knot epitomizes classic elegance. Boasting a wide, symmetrical shape, the knot’s large size exudes confidence, making it an ideal choice for weddings. Pair it with a medium or wide spread collar shirt to make a refined yet bold statement. See below for Windsor knot steps. 

How to Tie a Full Windsor Knot 

  1. Drape the wide end of the tie under the left side of your collar, making sure it hangs about 12 inches below the tie’s narrow end. 
  2. Cross the wide end of the tie over the narrow end. 
  3. Thread the wide end under the cross and pull it through the loop. Confirm that the wide end of the tie is on your right side.
  4. Bring the wide end underneath the knot from left to right. 
  5. Take the wide end through the loop from the outside. Confirm the wide side is now on your left side. 
  6. Wrap the wide end of the tie over the knot from left to right. 
  7. Bring the wide end underneath the front knot and through the loop. 
  8. Slide the wide end through the knot. 
  9. Tighten and adjust the knot. To create a refined dimple under the knot, press the area with your index finger as you pinch the sides of the knot with your thumb and middle finger.  
  10. Accessorize with a tie bar, clip, or pin (optional).  

The Half Windsor Knot

How to Tie a Tie: Step-by-Step Guides to 4 Classic Knots
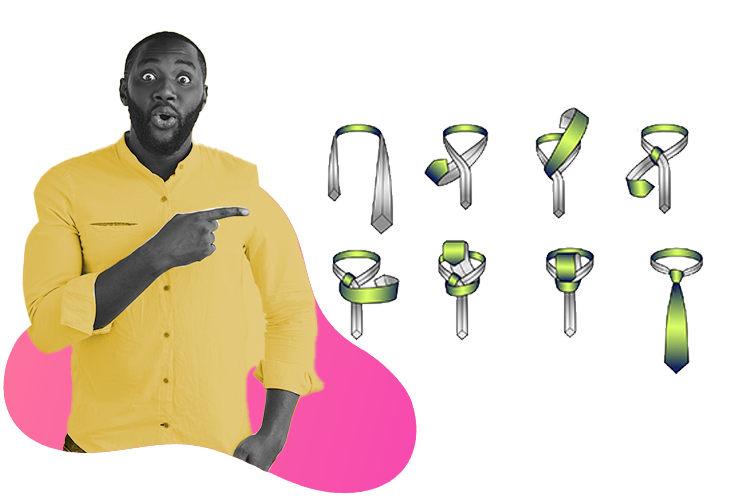
Like the full Windsor knot, the half Windsor creates a relatively symmetrical triangle. However, the half Windsor is about 25% smaller than its counterpart, making it easier to tie, but less formal. Ideal for medium or wide-spread collars, it’s balanced and stylish.

How to Tie a Half Windsor Knot 

  1. Drape the wide end of the tie under the right side of your collar, ensuring it hangs about 8 inches below the thin end of the tie.
  2. Cross the wide end over the narrow end. 
  3. Thread the wide end of the tie under the loop. 
  4. Pull the wide end over and through the loop. 
  5. Bring the tie over the knot from left to right, wrapping it over and under the knot as you go.  
  6. Slide the tie through the loop. 
  7. Pull the wide end of the tie through the knot. 
  8. Adjust the knot as needed. To create a dimple, press your index finger under the knot while pinching the sides with your middle finger and thumb.

The Pratt Knot

How to Tie a Tie the Pratt Knot
Meet the Pratt knot, the stylish middle ground between a four-in-hand and a half Windsor. Named after Jerry Pratt, a U.S. Chamber of Commerce executive who donned it daily for 30 years, its fame soared when anchor Don Shelby showcased it on TV in the late 1980s (which is why it’s also called the Shelby knot). 

This relatively symmetrical, medium-sized knot exudes elegance and versatility. Ideal for work or a semi-formal wedding, it’s best paired with a narrow or medium-spread collar. Note it’s not a fit for black-tie weddings

How to Tie a Pratt Knot

  1. Place the wide end of the tie to the left and the thin end to the right, ensuring the backside of the tie is facing outward. Ensure the tip of the thin end hits just above your navel. 
  2. Moving from left to right, cross the wide end under the thin end. 
  3. Pull the wide end of the tie to the center and through the loop. 
  4. Bring the wide end to the right side, then cross it over the thin end. 
  5. Pull the wide end underneath the thin end and up through the loop. 
  6. Thread the wide end through the loop.
  7. Tighten the knot gently by pulling the wide end. 
  8. Accessorize with a tie bar, clip, or pin (optional).  

How to Tie a Tie FAQs

How Do I Choose the Right Tie for a Wedding Outfit?

The right tie matches the event’s formality and any theme or dress code. It should complement your shirt and suit. When in doubt, you can’t go wrong with classic colors (navy blue, burgundy, or dark green) and patterns (solids, herringbone, stripes, or polka dots). 

What is the Best Tie Knot for a Wedding?

Think about your shirt collar and its size and style. Smaller collars work better with thinner knots and vice versa. Also, consider the wedding dress code. Windsor and half Windsor knots are suited to semi-formal and formal occasions. 

How Long Should a Tie Be for a Wedding Outfit?

Ideally, the tip of your tie should reach the middle or bottom of your belt buckle. If it falls above that, you’ll look unbalanced and awkward. Any longer, and you’ll look untidy. The best rule of thumb is to ensure the tie length complements your unique body proportions and suit style.  

The Groom Club Answers All Your Style Questions

Now that you’ve become a tie-tying master, it’s time to tackle all your other wedding wardrobe woes. Whether choosing the perfect suit color or mastering the art of folding pocket squares, we’ll ensure you look your absolute best. Check out our Groom Hacks page for answers to any fashion-related questions before the wedding.

You May Also Like: